Create Item with Specific Id Using PowerShell

Recently, I was working on Content Import in Sitecore project. Of course, I was using my most favourite tool, PowerShell for this. Ultimately I landed in a situation where few items were referring non-existent item’s id. It appeared as a broken and I was looking for options fix it.

One option was to create a new item and replace broken id with new one. Fortunately, I found an option where we can force an id for created item. The only condition is that it has to be provided while creating item, as id cant be altered after creation of item. Here is how to do it using PowerShell

New-Item -Path "master:\content\home" -Name "Demo" -ItemType "Sample/Sample Item" -ForceId "9f28cc25-5e01-4858-985e-386fcf9991b9"

That was simple. But there is a catch, it wont work when you are creating an item from Branch temple. The reason is current PowerShell implementation does not consider -ForceId parameter.

https://github.com/SitecorePowerShell/Console/blob/master/src%2FSpe%2FCore%2FProvider%2FPsSitecoreItemProvider.cs#L774

So there is no use of this parameter when creating an item with branch template.

But kudos to this article, though it is old, it’s still valid. I am copying code here to display, all credit to the original author !

function New-ItemCustom

{
<#
.SYNOPSIS
Create a new Sitecore item based on template/branch ID. Specify
the NewItemID to create the item with the specific ID.
#>
[CmdletBinding()]
param
(
[Parameter(Mandatory=$True)]
$Name,
[Parameter(Mandatory=$True)]
[string]$TemplateID,
[Parameter(Mandatory=$True)]
$ParentItem,
[string]$NewItemID = ""
)

$scTemplateID = New-Object -TypeName "Sitecore.Data.ID" -ArgumentList $TemplateID
$newItem = $null

if ($NewItemID -ne "")
{
$scItemID = New-Object -TypeName "Sitecore.Data.ID" -ArgumentList $NewItemID
$newItem = [Sitecore.Data.Managers.ItemManager]::AddFromTemplate($Name, $scTemplateID, $ParentItem, $scItemID)
}
else
{
$newItem = [Sitecore.Data.Managers.ItemManager]::AddFromTemplate($Name, $scTemplateID, $ParentItem)
}

return $newItem
}

Just use above function in your script and use it as follows –

New-ItemCustom -Name "new item name" -TemplateID "template/branch ID" -ParentItem (Get-Item -Path: .) -NewItemID "Sitecore Item ID here"

Simple, Again !! Happy Coding !!!

Re: Sitecore Containers without Docker Desktop

I recently blogged about how to run Windows containers witout Docker Desktop. This articles is mainly focusing Sitecore but it should be useful to one’s who are trying to run Windows containers.

This post is just to reshare the post present at https://blogs.perficient.com/2023/10/12/sitecore-containers-without-docker-desktop/

Since above post asks you to cleanup docker resources first, do try this to reclaim your space as well. Anyway you are going to setup Docker Engine from scratch and you will need SPACE !

Best of luck with your Docker Engine setup !

Regain disk space occupied by Docker

If you are irritated with Docker WindowFilter taking up lot of your disk space, then don’t worry, You are not the only one. The accumulation of files under Docker > WindowFilter is a common problem.

Recently, I was running out of disk space and was looking of ways to regain that.

Most of googled options would ask you to docker system prune which removes all dangling images, containers and volumes. It freed up some space but still there was scope.

I used TreeSize software to check folder which are largely occupying space. And culprit came out to be WindowsFilter folder. Over time, Docker container create layers of unused data in WindowsFilter folder eating up disk space. It can be frustrating when it occupies significant space (~140 GB in my case).

Although Docker has in-built ability to identify & clean these orphan layers which occurs when docker shuts down. But by default it gets only 15 seconds to do so which is not enough to handle large files. And it results into piling up orphan layers.

But deleting it is not that simple –

  • First, it won’t let you delete it with Window’s Delete option
  • Second, deleting all folders can delete your containers if those folders are in use.

Thinking of Options…

One suggestion was  docker-ci-zap (Read More) But I was reluctant to do as few cautioned to use it at your own risk as it may disturb your Docker Service which is not ideal. So I skipped it.

NOTE: If you wish to forcefully delete the windowsfilter folder, then it is a great (rather, the best) option. This works even on orphaned windowsfilter folders when you don’t have the Docker service running. Simply download zip from here (GIT repo – https://github.com/moby/docker-ci-zap ) and run file as mentioned in Readme with appropriate parameters/folder path.

My Solution

Fortunately I landed on one of the discussion which has a PowerShell script to help us vacate space.

Steps to perform

  • Download PowerShell script and execute (as Administrator) with parameter  -RenameOrphanLayers
.\Find-OrphanDockerLayers.ps1 -RenameOrphanLayers

This will add -removing suffix to all orphan layer lying in the folder as below. This won’t actually remove it, you need further steps to do so.

Now the cleanup occurs when docker service shuts down. But Default shutdown timeout is only 15 seconds which is not enough to clean up these layers. So you need to allow more time for this activity. (I needed around 25-30 minutes to clean all data.) But how to do that ?

It easy, just

  • Stop the Docker service,
  • Start it manually with command
dockerd -D --shutdown-timeout 900 

This 900 here, are seconds which is 15 minutes. You can set it as per your need.

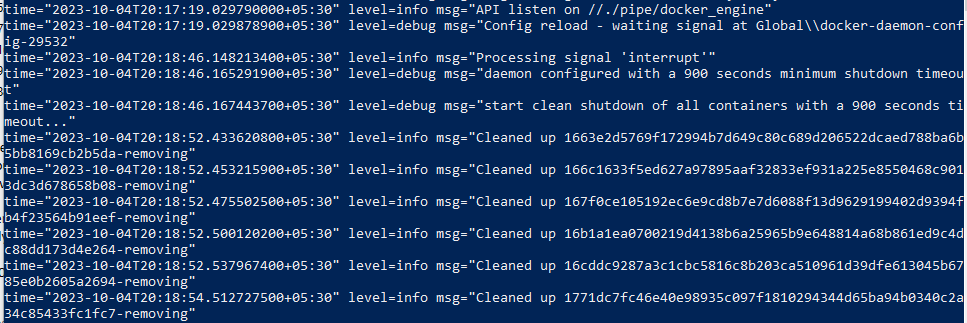
It will halt at below line, just press + C and be patient.  It will show you logs of cleanup,

time="2023-10-04T20:17:19.029790000+05:30" level=info msg="API listen on //./pipe/docker_engine"

Now orphan layers will be removed one by one and you will start seeing similar message as below –

time="2023-10-04T20:18:52.453215900+05:30" level=info msg="Cleaned up 166c1633f5ed627a97895aaf32833ef931a225e8550468c9013dc3d678658b08-removing"

At the end, if it is able to Clean all orphan layers, then you will see below message –

time="2023-10-05T12:12:36.181982100+05:30" level=debug msg="Clean shutdown succeeded" 
time="2023-10-05T12:12:36.193753900+05:30" level=info msg="Daemon shutdown complete"

In case this time not enough to clean those files, it will forcefully shutdown with below message –

time="2023-10-04T20:33:46.172659200+05:30" level=error msg="Force shutdown daemon"
time="2023-10-04T20:33:46.176820100+05:30" level=info msg="Daemon shutdown complete"

If this happens, execute below command again to allow it more time for clean-up.

dockerd -D --shutdown-timeout 900 

I hope this gives you enough SPACE 😉

Using Content Tokens with jQuery script in SXA

Recently, in a special requirement, we had to allow script tag in Rich Text editor during Sitecore upgrade. Though this is not recommended, we chose this path as migrated Rich content had scripts from original source.

To achieve this, I disabled “HtmlEditor.RemoveScripts” setting. Though it looked easy, it had side effects. Suddenly this started breaking few pages in Preview and Published mode. (SC 10 with SXA).

This was very unusual and while investigating, I realised that $ was culprit. (I know this is not pleasant but this was my introduction to content tokens.)

In SXA, there is a feature called Content tokens. This is convenient when you need reusable lines of text/numbers to use within site. For more details, you can refer this great article.

If you see in above Sitecore’s official doc, these tokens are evaluated in Preview mode and actual Web Page which has to be entered after $ symbol. Due to this, jQuery variable ($) was interpreted as a beginning of token and processor could not find token item. Hence it errored out saying Null Item.

So, to conclude, you can either use $ symbol in Single Line/ Multiline/ Rich Text or can use Content tokens. There are 2 ways to handle this,

  • Get rid of Content Tokens feature. (Not recommended) You will need to disable its config located at ~webroot\App_Config\Modules\SXA\Feature\Sitecore.XA.Feature.ContentTokens.config
  • Get rid of $ symbol in Script. And make sure that your Content Author doesn’t use it henceforth.

You may face this if you are migrating content from non SXA sites to SXA. My recommendation would be to re-write jQuery with javascript.

Happy Debugging !!

Site definition in SXA

SXA, a buzz word in Sitecore, is a rapid way to build your sites with Sitecore. It is a tool that provides you predefined and standard ways to produce your site. Creating Tenants and Websites is just a act of few clicks. But if you compare with traditional way of creating sites in Sitecore, ever wondered, where does it maintain Site Definition?

Traditionally, we created a site definition configuration when adding a new site, like this –

 <site
        
name=”website”
        virtualFolder
=”/”
        physicalFolder
=”/”
        rootPath
=”/sitecore/content”
        startItem
=”/home”
        language
=”en”
        database
=”web”
        domain
=”extranet”
        allowDebug
=”true”
        cacheHtml
=”true”
        htmlCacheSize
=”10MB”
        enablePreview
=”true”
        enableDebugger
=”true” />

But with SXA, you do not need to care about it anymore. SXA creates site definition in a content tree at path. Now, if you compare all attributes from above configuration patch with this item field, you will realize its all same. Bingo!

This is a path to definition item,

/sitecore/content/~Tenant~/../~Site~/Settings/Site Grouping/~Site Name~

site definition fields

Now what if you wish to add a dictionary root in your site. Yeah, you guessed it right !!! Just add a DictionaryRoot attribute along with its value here and you are good to go.

dictionaryroot

You may add all such properties from site definition to modify your site definition.

Happy coding..

Redirect Rule to Restrict Sitecore Admin

As a part of Security hardening on CD environments, Sitecore access on CD should be restricted. There are numerous way to achieve this. But in case you wish to perform it using redirect rules, here it is –

<rule name="Restrict Sitecore" stopProcessing="true" >
     <match url=".*" />​​
     <conditions>​​
      <add input="{URL}" pattern="^/sitecore//?.*" />​​
      <add input="{URL}" pattern="^/sitecore/service/?.*" negate="true" />​​
     </conditions>​​
     <action type="Redirect" url="/" appendQueryString="false" />​​
 </rule>

Explanation :

  • Condition 1 (“^/sitecore//?.*”)
    • It would match all urls that has /sitecore/ in it.
  • Condition 2 (“^/sitecore/service/?.*”)
    • It would skip all the urls that has /sitecore/service/. This is required to allow service related urls that might communicate to CM site for data flow.
  • Action (“/”)
    • Redirect to Home page

Note : If you have any pages that are using resources from Sitecore folder, please make sure it’s working especially forms.

Clear Sitecore 9 Forms data

Sitecore 9 has added forms feature and we do not need an external module anymore. While we all have been using this, I came across a requirement of deleting all forms data when we completed testing it.

This is a very common scenario, but currently there is no native feature to do so. I contacted Sitecore support for this and they informed that they will be adding this feature in coming version. But till then, we can clear forms data and it is pretty simple.

Sitecore manages all the data in instanceName_ExperienceForms database. It has two tables –

  • FormsEntry
    • It records all entries submitted for forms along with FormId
  • FieldData
    • It records all entered data values for all form fields along with FormEntryID from above table.

You can clear this data to clear form data. Here is a database script that you can use to delete data of

  • all forms
  • specific form
  • form in a date range

Just make sure you execute it on your instanceName_ExperienceForms database.

BEGIN TRANSACTION [ClearFormData]
  Declare @createdFrom DateTime
  Declare @createdTo DateTime
  Declare @formId uniqueidentifier 
  Set @createdFrom = '2019-05-20' -- set your from date here (Range include both these dates)
  Set @createdTo = '2019-05-21' -- set your to date here
  Set @formId = '3317432C-DF54-4E54-B92A-1BA9AAEA2294' -- form id in same format as this (remove '{}')

  BEGIN TRY

	Delete FieldData
	from FormEntry right join [FieldData]
	on [FormEntry].ID = [FieldData].[FormEntryID]
--	where FormItemID = @formId -- * Uncomment this line to delete data for a single form *
--	and (cast(Created as date) between @createdFrom and @createdTo) -- * Uncomment this line to delete for mentioned duration *

      Delete From [FormEntry]  
--	  where FormItemID = @formId -- * Uncomment this line to delete data for a single form *
--	and (cast(Created as date) between @createdFrom and @createdTo) -- * Uncomment this line to delete for mentioned duration *

      COMMIT TRANSACTION [ClearFormData]
  END TRY
  BEGIN CATCH
      ROLLBACK TRANSACTION [ClearFormData]
  END CATCH

Happy Coding !!

Sitecore 9 License Location

As a part of go live activity, I was supposed to update Sitecore license on different environments. Before Sitecore 9, it was a an easy task with license present at just one location (inside data folder).

But now with Sitecore 9, with addition of Xconnect and IdentityServer sites, updating license isn’t as simple as before. Here is a list of locations where Sitecore license sits in case you wish to change –

1. Sitecore

1.1) Website (~sc-webroot~\App_Data)

2. Xconnect site

2.1) Website (~xconnect-webroot~\App_Data)

2.2) Automation Engine (~xconnect-webroot~\App_Data\jobs\continuous\AutomationEngine\App_Data)

2.3) Index Worker (~xconnect-webroot~\App_Data\jobs\continuous\IndexWorker\App_data)

2.4) Processing Engine* (~xconnect-webroot~\App_Data\jobs\continuous\ProcessingEngine\App_Data)

3. Identity Server

3.1) Website* (~identity-webroot~\sitecoreruntime)

Note:

  • Point 2.4 and 3.1 applies to SC 9.1 instance.
  • For points 2.2, 2.3 and 2.4 (if applicable), you will need to manually restart the associated Windows service afterwards.

Happy coding !!